To install Apache as a service on Windows browse to the Apache Flder through the command line and enter the following command
apache -i -n "Service Name"
Service Name is the name of the service that you want to give it.
To name it Apache enter the following command
apache -i -n "Apache"
Quotes are required if the Service name that you want has blank space(s)
if it succeeds test it with the follwing command to start the service. from next time the Service will start when the windows starts.
apache -n "Apache" -k start
Have fun, no extra window opened all the time to annoy you and no pain of having to start the Apache web server each time you boot your system
For further documentation visit http://httpd.apache.org/docs/1.3/win_service.html
Showing posts with label Apache. Show all posts
Showing posts with label Apache. Show all posts
Saturday, October 27, 2007
Alias Directive in Apache HTTP Server
http://httpd.apache.org/docs/2.2/mod/mod_alias.html#alias
The Alias directive allows documents to be stored in the local filesystem other than under the DocumentRoot. URLs with a (%-decoded) path beginning with url-path will be mapped to local files beginning with directory-path. The url-path is case-sensitive, even on case-insenitive file systems.
Example:
Alias /image /ftp/pub/image
A request for http://myserver/image/foo.gif would cause the server to return the file /ftp/pub/image/foo.gif. Only complete path segments are matched, so the above alias would not match a request for http://myserver/imagefoo.gif. For more complex matching using regular expressions, see the AliasMatch directive.
Note that if you include a trailing / on the url-path then the server will require a trailing / in order to expand the alias. That is, if you use Alias /icons/ /usr/local/apache/icons/ then the url /icons will not be aliased.
Note that you may need to specify additional <directory> sections which cover the destination of aliases. Aliasing occurs before <directory> sections are checked, so only the destination of aliases are affected. (Note however <location> sections are run through once before aliases are performed, so they will apply.)
In particular, if you are creating an Alias to a directory outside of your DocumentRoot, you may need to explicitly permit access to the target directory.
Example:
         Alias /image /ftp/pub/image
<directory>
             Order allow,deny
Allow from all
         </directory>
PS: The directive Alias should be inside the tag as in the following example
<IfModule alias_module>
Alias /seagull E:\rungta\workspaces\Eclipse_PDT_Europa\Seagull\www</IfModule>
Alias /project1 E:\rungta\workspaces\Eclipse_PDT_Europa\Project1
Then set the Target Directory Access permission outside the ifModule Tag
<Directory E:\rungta\workspaces\Eclipse_PDT_Europa\Seagull\www>
Order allow,deny
Allow from all
</Directory>
<Directory E:\rungta\workspaces\Eclipse_PDT_Europa\Project1>
Order allow,deny
Allow from all
</Directory>
Setting up XAMPP for LAMP Development on Windows
Out of several LAMP/WAMP stack packages available in the market I prefer XAMPP from http://apachefriends.org when Working on a Windows machine for my Development Environment.
The XAMPP for Windows can be downloaded from the following link
http://www.apachefriends.org/en/xampp-windows.html
I download/keep the zip archive of the Basic package XAMPP Windows 1.6.4 which has the following components
Apache HTTPD 2.2.6, MySQL 5.0.45, PHP 5.2.4 + 4.4.7 + PEAR + Switch, MiniPerl 5.8.7, Openssl 0.9.8e, PHPMyAdmin 2.11.1, XAMPP Control Panel 2.5, Webalizer 2.01-10, Mercury Mail Transport System v4.01a, FileZilla FTP Server 0.9.23, SQLite 2.8.15, ADODB 4.94, Zend Optimizer 3.3.0, XAMPP Security, Ming. For Windows 98, 2000, XP.
After downloading it if you unzip the archive you will get a folder structure something like the following
---------------------------------
./xampp
./xampp/apache
./xampp/php
./xampp/mysql
./xampp/perl
---------------------------------
Copy the XAMPP folder to the root of any Drive (Its not really required but to avaoid any hassle I recommend that you copy it to the Local Drive root and avoid spaces in any of the paths to all executables)
You can run the Server in many ways. I am going to describe some of them here.
Note: Before proceeding you need to make sure that the default Ports for the Servers that you wish to run or install are free. You can check this by running the Executable file ./xampp/xampp-portcheck.exe This will tell you whether the ports are free or not. if any of the port numbers 80(for HTTP Server) and 443(for HTTPS Server) is not free you will either need to stop/disable the Application that is running on this port or you will need to configure the Apache Server to run on some other port.
To change the default HTTP Port 80 for Apache open the config file ./xampp/apache/conf/httpd.conf in a text editor and replace all occurances of 80 to the new Port (Which should again obviously be free).
If you need to change the port 443 then open the file ./xampp/apache/conf/extra/httpd-ssl.conf and replace the occurances of 443 with the new port.
Similarly to run MySQL on a different port you will need to make changes in the file ./xampp/my.ini by replacing the default Port number 3306 with some other free valid port number.
If you are not a hard core LAMP Developer and going to have to run the server only occasionally You can start the Apache Server by executing the Batch file ./xampp/apache_start.bat in the root XAMPP folder. and to run the MySQL server run the Batch file ./xampp/mysql_start.bat
You should be all set to run your applications. Copy Your Applications directory to ./xampp/htdocs/MyAPP/* and you can access the Application with a url http://localhost/MyApp and http://localhost/MyApp/*
But this scheme has a drawback that you cat close the dos window unless you want to stop the Servers. To do so you have to run the Batch files ./xampp/apache_stop.bat
and ./xampp/mysql_stop.bat to stop them.
XAMPP Provides a Control Panel which is a file named ./xampp/xampp-control.exe if you run it you will get a User interface as in the following screenshot
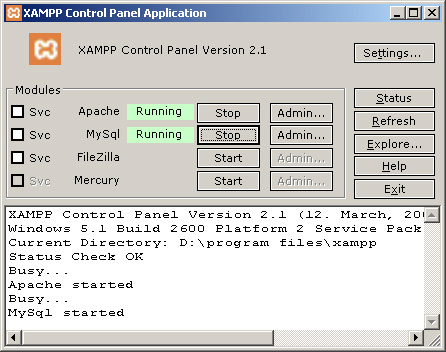
You can simply Start and Stop by clicking the button with appropriate label beside each service. Bothe Servers are in running mode in the above Screen shot. so you don't see the Button labeled Start here.
This scheme is very cool but if you are a hard code developer and will need the Server running all the time then probably you wouldn't want to have to start the Servers manually each time you boot your System.
You can install the Servers as a Windows Server by clicking on the checkbox beside the respective Server. Make sure to stop the Server you are installing as a Service before checking the checkbox to install it.You will be prompted to confirm if you really want to install it as a service. It will be installed if you confirm by clicking the button labeled "OK" Once the Service is installed you can start the Servers manually by clicking on the Start button here for the first and last time.
Note: If you have the XAMPP folder in D and select the Service option then you will have to run the Script .xampp/setup_xampp.bat before proceeding because of some bug in this version (not sure about other versions.).
You should be all set now. next time you boot the System both the Servers will be started automatically.
Checklists:
Ports
XAMPP Path
Happy Developing on LAMP/WAMP ...
Subscribe to:
Posts (Atom)

