Today I gave it another try to generate the site-map for the Web Portal I am working on.
You don't really need to have the Access to the Command line for Python Scripting in the Server nor do you need to have the capability to run Python scripts in the Server.
Here are the steps that I followed to achieve this.
Downloaded the sitemap_gen Project files from Sourceforge referred from Google's Webmaster Pages at Google Sitemap Generator
You will require Python installed in your system. visit Python Home page to download and install it In my case it was already installed.
Follow the steps mentioned at https://www.google.com/webmasters/tools/docs/en/sitemap-generator.html to configure the config file.
Here I used my local site information instead of the real site as I did not have access to the Server to run a Python script.
The Sitemap generator checks your server logs and checks the files system to generate the site map. I configured for all these information required.
Now when I run the script it created a few links in the sitemap as the Server log had very few urls.
At this point I download a Link Checker from http://sourceforge.net/projects/linkchecker/
you can use any link checker. This is just so that I will run it to create enough log information in the log file so that they will be included sitemap generator when creating the sitemap.
Here I did a number of trial and error to exclude what was not required and after a few iteration when I I was done with creating the Sitemap by running the Python script up to my satisfaction I replaced the local urls with the Actual urls and then uploaded the file sitemap.xml and submitted the same to Google.
Saturday, October 27, 2007
Google Talk Polygamy for multiple identities
I can now log into multiple Google Account at the same time on Google Talk Desktop Client.
On Google's own Google Talk client for Windows...
No need to be logged in with various Browsers for different identities...
Basically, to have "Google Polygamy" you need to run Google Talk with the following switch: /nomutex
1. Right-click on the desktop
2. Select New
3. Select Shortcut
4. Paste this into the text box:
"c:\program files\google\google talk\googletalk.exe" /nomutex
5. Click Next and choose a shortcut name such as Google Talk1, Google Talk2, or something related to your Gmail account for easy remembering which account is which.
Google Talk Polygamy for multiple identities
Running Apache as a service on Windows
To install Apache as a service on Windows browse to the Apache Flder through the command line and enter the following command
apache -i -n "Service Name"
Service Name is the name of the service that you want to give it.
To name it Apache enter the following command
apache -i -n "Apache"
Quotes are required if the Service name that you want has blank space(s)
if it succeeds test it with the follwing command to start the service. from next time the Service will start when the windows starts.
apache -n "Apache" -k start
Have fun, no extra window opened all the time to annoy you and no pain of having to start the Apache web server each time you boot your system
For further documentation visit http://httpd.apache.org/docs/1.3/win_service.html
Alias Directive in Apache HTTP Server
http://httpd.apache.org/docs/2.2/mod/mod_alias.html#alias
The Alias directive allows documents to be stored in the local filesystem other than under the DocumentRoot. URLs with a (%-decoded) path beginning with url-path will be mapped to local files beginning with directory-path. The url-path is case-sensitive, even on case-insenitive file systems.
Example:
Alias /image /ftp/pub/image
A request for http://myserver/image/foo.gif would cause the server to return the file /ftp/pub/image/foo.gif. Only complete path segments are matched, so the above alias would not match a request for http://myserver/imagefoo.gif. For more complex matching using regular expressions, see the AliasMatch directive.
Note that if you include a trailing / on the url-path then the server will require a trailing / in order to expand the alias. That is, if you use Alias /icons/ /usr/local/apache/icons/ then the url /icons will not be aliased.
Note that you may need to specify additional <directory> sections which cover the destination of aliases. Aliasing occurs before <directory> sections are checked, so only the destination of aliases are affected. (Note however <location> sections are run through once before aliases are performed, so they will apply.)
In particular, if you are creating an Alias to a directory outside of your DocumentRoot, you may need to explicitly permit access to the target directory.
Example:
         Alias /image /ftp/pub/image
<directory>
             Order allow,deny
Allow from all
         </directory>
PS: The directive Alias should be inside the tag as in the following example
<IfModule alias_module>
Alias /seagull E:\rungta\workspaces\Eclipse_PDT_Europa\Seagull\www</IfModule>
Alias /project1 E:\rungta\workspaces\Eclipse_PDT_Europa\Project1
Then set the Target Directory Access permission outside the ifModule Tag
<Directory E:\rungta\workspaces\Eclipse_PDT_Europa\Seagull\www>
Order allow,deny
Allow from all
</Directory>
<Directory E:\rungta\workspaces\Eclipse_PDT_Europa\Project1>
Order allow,deny
Allow from all
</Directory>
Plcaing Ad Banners through phpAdsNew/Openads in vBulletin
This tutorial instructs you to help display your Custom Ad Banners in vBulletin Discussion Board (one of the most popular bulletin boards Software) using Openads, formerly called phpadsnew (The most popular adserver solution)
There are two things needed to be done to achieve this..
First you need to execute the invocation code for the banner trough vBulletin to initialize the variables for the banners.
This can be done using the Hook system in vBulltin, by creating a Plugin
if (@include(getenv('DOCUMENT_ROOT').'/manager/phpadsnew.inc.php'))
{
if (!isset($phpAds_context))
{
$phpAds_context = array();
}
$phpAds_raw01 = view_raw ('zone:1', 0, '', '', '0', $phpAds_context);
$phpAds_raw02 = view_raw ('zone:2', 0, '', '', '0', $phpAds_context);
$phpAds_raw03 = view_raw ('zone:3', 0, '', '', '0', $phpAds_context);
$phpAds_raw04 = view_raw ('zone:4', 0, '', '', '0', $phpAds_context);
//** initialize as many AdBanners as you want here ***
}
Now the second Step:
After deciding where you want to place the Ads, you need to identify the template for the section in which you want it displayed for example if you want to display the Ad in your left Column then you need to select the left column template from the Admin panel
<br />
<table align="center" border="0" cellpadding="$stylevar[cellpadding]" cellspacing="$stylevar[cellspacing]" class="tborder" width="90%">
<tr>
<td class="tcat"><span class="smallfont"><b>» Block Name</b></span></td>
</tr>
<tr<
<td color="#FFFFFF" width="100%" bgcolor="#FFFFFF">
<!-- Begin custom code -->
$phpAds_raw01[html]
$phpAds_raw02[html]
<!-- all the AdBanners you want to display here -->
<!-- End custom code -->
</td>
</tr>
</table>
<br />
Click on the Save Button and you should be done..
There are two things needed to be done to achieve this..
First you need to execute the invocation code for the banner trough vBulletin to initialize the variables for the banners.
This can be done using the Hook system in vBulltin, by creating a Plugin
- Follow the steps mentioned below to do this.
- In the admin panel goto Plugins & Products -> Plugin Manager
- Click on the link Add New Plugin(You will find this at the bottom of the page)
- In the resulting page do the followings..
- Select vBulletin from the Select Box labeled Product
- Select global_start from the Select Box labeled Hook Location
- Enter a title for this plugin let's name it phpAdsNew
- Enter the invocation code of your ad banner in the text area labeled Plugin PHP Code except the echo part(because you dont want to display the Ads here)
if (@include(getenv('DOCUMENT_ROOT').'/manager/phpadsnew.inc.php'))
{
if (!isset($phpAds_context))
{
$phpAds_context = array();
}
$phpAds_raw01 = view_raw ('zone:1', 0, '', '', '0', $phpAds_context);
$phpAds_raw02 = view_raw ('zone:2', 0, '', '', '0', $phpAds_context);
$phpAds_raw03 = view_raw ('zone:3', 0, '', '', '0', $phpAds_context);
$phpAds_raw04 = view_raw ('zone:4', 0, '', '', '0', $phpAds_context);
//** initialize as many AdBanners as you want here ***
}
Now the second Step:
After deciding where you want to place the Ads, you need to identify the template for the section in which you want it displayed for example if you want to display the Ad in your left Column then you need to select the left column template from the Admin panel
- Admin CP -> Styles & Templates -> Style Manager
- select Edit Templates from the drop down box
- double click on the item left_column
<br />
<table align="center" border="0" cellpadding="$stylevar[cellpadding]" cellspacing="$stylevar[cellspacing]" class="tborder" width="90%">
<tr>
<td class="tcat"><span class="smallfont"><b>» Block Name</b></span></td>
</tr>
<tr<
<td color="#FFFFFF" width="100%" bgcolor="#FFFFFF">
<!-- Begin custom code -->
$phpAds_raw01[html]
$phpAds_raw02[html]
<!-- all the AdBanners you want to display here -->
<!-- End custom code -->
</td>
</tr>
</table>
<br />
Click on the Save Button and you should be done..
Shirky: Ontology is Overrated -- Categories, Links, and Tags
An article on the importance of categorizing things. Read this while reading a thread on the Zoints - Tagging plugin for PaGaLGuY Forum Shirky: Ontology is Overrated -- Categories, Links, and Tags: "Ontology is Overrated: Categories, Links, and Tags"
vB Survey a Survey tool for vBulletin
vB Survey: Add a full-featured survey tool to your forum
http://www.vbulletin.org/forum/showthread.php?t=131650
http://www.vbulletin.org/forum/showthread.php?t=131650
How to Install Plug-ins/Hooks in vBulletin
Today I learned How to Install Plug-ins/Hooks in vBulletin
Check this thread on a simple instruction on how to install Hacks or plugins
http://www.vbulletin.org/forum/archive/index.php/t-82621.html
http://www.vbulletin.org/forum/showthread.php?t=39142
Check this thread on a simple instruction on how to install Hacks or plugins
http://www.vbulletin.org/forum/archive/index.php/t-82621.html
http://www.vbulletin.org/forum/showthread.php?t=39142
Google Customized Search Engine
Playing around with Google Customized Search Engine.
Created a new Customized Search Engine with the following attributes.
Search engine name: Web Development on LAMP
Search engine description:: Web Development on LAMP
Search engine keywords:PHP, JavaScript, MySQL, HTML, CSS, Web, Development,
How to search included sites:
You can add the Search engine as a button if you have the Google toolbar installed in your browser. by clicking on the following link
http://toolbar.google.com/buttons/add?url=http://bijay.rungta.googlepages.com/WebDevelopmentOnLAMP.xmlLooks good so far...
Here is the Home page of the Search Engine
http://www.google.com/coop/cse?cx=004917130917186567756%3Abnjzh5zpjj4&hl=en
Setting up XAMPP for LAMP Development on Windows
Out of several LAMP/WAMP stack packages available in the market I prefer XAMPP from http://apachefriends.org when Working on a Windows machine for my Development Environment.
The XAMPP for Windows can be downloaded from the following link
http://www.apachefriends.org/en/xampp-windows.html
I download/keep the zip archive of the Basic package XAMPP Windows 1.6.4 which has the following components
Apache HTTPD 2.2.6, MySQL 5.0.45, PHP 5.2.4 + 4.4.7 + PEAR + Switch, MiniPerl 5.8.7, Openssl 0.9.8e, PHPMyAdmin 2.11.1, XAMPP Control Panel 2.5, Webalizer 2.01-10, Mercury Mail Transport System v4.01a, FileZilla FTP Server 0.9.23, SQLite 2.8.15, ADODB 4.94, Zend Optimizer 3.3.0, XAMPP Security, Ming. For Windows 98, 2000, XP.
After downloading it if you unzip the archive you will get a folder structure something like the following
---------------------------------
./xampp
./xampp/apache
./xampp/php
./xampp/mysql
./xampp/perl
---------------------------------
Copy the XAMPP folder to the root of any Drive (Its not really required but to avaoid any hassle I recommend that you copy it to the Local Drive root and avoid spaces in any of the paths to all executables)
You can run the Server in many ways. I am going to describe some of them here.
Note: Before proceeding you need to make sure that the default Ports for the Servers that you wish to run or install are free. You can check this by running the Executable file ./xampp/xampp-portcheck.exe This will tell you whether the ports are free or not. if any of the port numbers 80(for HTTP Server) and 443(for HTTPS Server) is not free you will either need to stop/disable the Application that is running on this port or you will need to configure the Apache Server to run on some other port.
To change the default HTTP Port 80 for Apache open the config file ./xampp/apache/conf/httpd.conf in a text editor and replace all occurances of 80 to the new Port (Which should again obviously be free).
If you need to change the port 443 then open the file ./xampp/apache/conf/extra/httpd-ssl.conf and replace the occurances of 443 with the new port.
Similarly to run MySQL on a different port you will need to make changes in the file ./xampp/my.ini by replacing the default Port number 3306 with some other free valid port number.
If you are not a hard core LAMP Developer and going to have to run the server only occasionally You can start the Apache Server by executing the Batch file ./xampp/apache_start.bat in the root XAMPP folder. and to run the MySQL server run the Batch file ./xampp/mysql_start.bat
You should be all set to run your applications. Copy Your Applications directory to ./xampp/htdocs/MyAPP/* and you can access the Application with a url http://localhost/MyApp and http://localhost/MyApp/*
But this scheme has a drawback that you cat close the dos window unless you want to stop the Servers. To do so you have to run the Batch files ./xampp/apache_stop.bat
and ./xampp/mysql_stop.bat to stop them.
XAMPP Provides a Control Panel which is a file named ./xampp/xampp-control.exe if you run it you will get a User interface as in the following screenshot
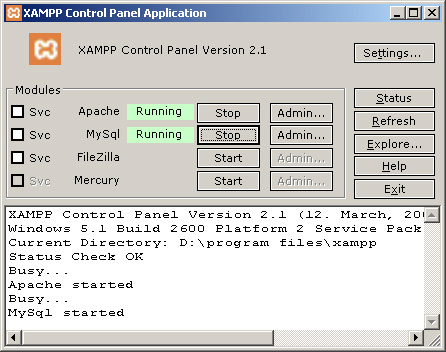
You can simply Start and Stop by clicking the button with appropriate label beside each service. Bothe Servers are in running mode in the above Screen shot. so you don't see the Button labeled Start here.
This scheme is very cool but if you are a hard code developer and will need the Server running all the time then probably you wouldn't want to have to start the Servers manually each time you boot your System.
You can install the Servers as a Windows Server by clicking on the checkbox beside the respective Server. Make sure to stop the Server you are installing as a Service before checking the checkbox to install it.You will be prompted to confirm if you really want to install it as a service. It will be installed if you confirm by clicking the button labeled "OK" Once the Service is installed you can start the Servers manually by clicking on the Start button here for the first and last time.
Note: If you have the XAMPP folder in D and select the Service option then you will have to run the Script .xampp/setup_xampp.bat before proceeding because of some bug in this version (not sure about other versions.).
You should be all set now. next time you boot the System both the Servers will be started automatically.
Checklists:
Ports
XAMPP Path
Happy Developing on LAMP/WAMP ...
The XAMPP for Windows can be downloaded from the following link
http://www.apachefriends.org/en/xampp-windows.html
I download/keep the zip archive of the Basic package XAMPP Windows 1.6.4 which has the following components
Apache HTTPD 2.2.6, MySQL 5.0.45, PHP 5.2.4 + 4.4.7 + PEAR + Switch, MiniPerl 5.8.7, Openssl 0.9.8e, PHPMyAdmin 2.11.1, XAMPP Control Panel 2.5, Webalizer 2.01-10, Mercury Mail Transport System v4.01a, FileZilla FTP Server 0.9.23, SQLite 2.8.15, ADODB 4.94, Zend Optimizer 3.3.0, XAMPP Security, Ming. For Windows 98, 2000, XP.
After downloading it if you unzip the archive you will get a folder structure something like the following
---------------------------------
./xampp
./xampp/apache
./xampp/php
./xampp/mysql
./xampp/perl
---------------------------------
Copy the XAMPP folder to the root of any Drive (Its not really required but to avaoid any hassle I recommend that you copy it to the Local Drive root and avoid spaces in any of the paths to all executables)
You can run the Server in many ways. I am going to describe some of them here.
Note: Before proceeding you need to make sure that the default Ports for the Servers that you wish to run or install are free. You can check this by running the Executable file ./xampp/xampp-portcheck.exe This will tell you whether the ports are free or not. if any of the port numbers 80(for HTTP Server) and 443(for HTTPS Server) is not free you will either need to stop/disable the Application that is running on this port or you will need to configure the Apache Server to run on some other port.
To change the default HTTP Port 80 for Apache open the config file ./xampp/apache/conf/httpd.conf in a text editor and replace all occurances of 80 to the new Port (Which should again obviously be free).
If you need to change the port 443 then open the file ./xampp/apache/conf/extra/httpd-ssl.conf and replace the occurances of 443 with the new port.
Similarly to run MySQL on a different port you will need to make changes in the file ./xampp/my.ini by replacing the default Port number 3306 with some other free valid port number.
If you are not a hard core LAMP Developer and going to have to run the server only occasionally You can start the Apache Server by executing the Batch file ./xampp/apache_start.bat in the root XAMPP folder. and to run the MySQL server run the Batch file ./xampp/mysql_start.bat
You should be all set to run your applications. Copy Your Applications directory to ./xampp/htdocs/MyAPP/* and you can access the Application with a url http://localhost/MyApp and http://localhost/MyApp/*
But this scheme has a drawback that you cat close the dos window unless you want to stop the Servers. To do so you have to run the Batch files ./xampp/apache_stop.bat
and ./xampp/mysql_stop.bat to stop them.
XAMPP Provides a Control Panel which is a file named ./xampp/xampp-control.exe if you run it you will get a User interface as in the following screenshot
You can simply Start and Stop by clicking the button with appropriate label beside each service. Bothe Servers are in running mode in the above Screen shot. so you don't see the Button labeled Start here.
This scheme is very cool but if you are a hard code developer and will need the Server running all the time then probably you wouldn't want to have to start the Servers manually each time you boot your System.
You can install the Servers as a Windows Server by clicking on the checkbox beside the respective Server. Make sure to stop the Server you are installing as a Service before checking the checkbox to install it.You will be prompted to confirm if you really want to install it as a service. It will be installed if you confirm by clicking the button labeled "OK" Once the Service is installed you can start the Servers manually by clicking on the Start button here for the first and last time.
Note: If you have the XAMPP folder in D and select the Service option then you will have to run the Script .xampp/setup_xampp.bat before proceeding because of some bug in this version (not sure about other versions.).
You should be all set now. next time you boot the System both the Servers will be started automatically.
Checklists:
Ports
XAMPP Path
Happy Developing on LAMP/WAMP ...
Monday, October 22, 2007
Test for Automatic Posting to your Other Blog at Blogger
This is the first test for posting your Blog to multiple Blogs at Blogger.
What I am going to do is to set this Blog to send an email to me whenever I Publish a Post in this Blog.
The email Account I have set to send the Blog Post to is a Gmail Account which has the filtering capability.
All mails that are sent on Publishing of new Posts have the Subject field in the format [<Blog Title>] <Post Subject>. I will create a filter in my Google account to filter these emails and forward them to the Mail-to-Blogger Address(an address by which you can post to your blog via email.) for the Other Blog. selecting the radio button labeled Save emails as draft posts so that I can make changes to the posts before publishing in the Other account. Not sure though this might not be required. let's see..
This should do the trick and make a post to the other Blogger account.
PS: hmmm didn't work. Gmail not forwarding the mail to Blogger. Tried various tricks but with no luck. May be will try again later. DO comment if you find any solution.
Subscribe to:
Posts (Atom)

